Bedknobs and Broomsticks Learning Experiences

Welcome to week 2 learning experiences based off of old classics found on the Disney+ streaming service! When deciding what to do for my next learning experience with my kiddos, I knew I wanted to do Bedknobs and Broomsticks. While skimming through Disney+ and seeing this movie listed, I couldn’t stop singing Portobello Road for the rest of the day. This movie is an interesting one because, although I grew up on it, I’ve encountered a bunch of people of various ages who have never seen it! I love the mix of the real and the animated, the magic of it, and the catchy tunes. Before viewing it with your kids, however, I want to mention a couple of things.
First of all, Bedknobs and Broomsticks is set in England during the Blitz (World War II) in 1940 and the bad guys are Nazis. Just want to throw that out there. Also, Professor Emelius Brown throws shade at Ms. Price a couple of times. Once he asks to keep something she has found for safekeeping because “Women always lose things” and a second time he’s looking for something in a hurry that is on her desk and comments “women never file things properly”. While this may have been a “funny” and acceptable joke in the early 70s, not so much now. This is something you may want to address with your children. You can let them know that there is in fact irony to the jokes because, during the course of the movie, much of Emelius Brown’s success is due to Ms. Price. Last of all, the end of the film does have some shooting of guns. When *spoiler alert* Ms. Price casts a spell on old sets of armor to fight against the Nazis (not as scary as it sounds, I promise!) the Nazis fire bullets at the empty suits of armor, but they keep coming because the bullets go right through. This is a very short part of the film and, if you’d rather skip it, is easy to fast forward though.
With that out of the way, let’s get started!
Supplies Needed
-A map, globe, or atlas
-Model Magic fast drying clay
-Craft Materials; these items will depend on what your child wants to do. See The Portobello Road activity below. Some ideas include construction paper, poster board, card stock, scissors, tape, coloring supplies, and cardboard.
-Liquid watercolor (food coloring and water will also work in a pinch!) and pipettes
-a clear cup, coins, and a notecard or piece of cardboard
The Hook- Where is London, England?
Before watching the movie, set the stage with your kids. Ask them if they know where England is. Provide a map, globe, or atlas. You can always find a map on your computer or device, but I recommend the tactile experience of an actual map, atlas, or globe. Find England together. Let them know that London is the capital of England. Ask what your child notices about England. They may refer to the size, or notice where it is in relation to where they live, or that it is an island. You can find other countries of similar size or find other islands. You can talk about other books or movies that are set in England. Some examples include Mary Poppins, the Harry Potter Series, and The Chronicles of Narnia. If your child has ever read or seen The Lion, The Witch, and The Wardrobe, you can mention that this movie takes place during the same time period and that the children in Bedknobs and Broomsticks are being evacuated to the countryside during the war to stay safe, just like the Pevensies in The Lion, the Witch, and The Wardrobe.
Touch on accents. Ask your children- do they know that they have accents? Everyone has an accent! I’ve learned that myself as a Michigander currently living in California. People would comment on my accent often, even when I didn’t think I spoke that differently from them! I point this out because the children in this movie could potentially be difficult to understand. A couple of times during the movie I had to pause and explain what they had said, due to the accents. This sets the expectation that they are going to sound a little different and why that is.
Now you’re ready to watch the movie! Enjoy the Magic of Bedknobs and Broomsticks!
The Beautiful Briny Sea- Sculpture with Model Magic
Have you ever used Model Magic? This may have been one of the most amazing things I’ve discovered during this time of Sheltering In Place. I did an online art tutorial with my children back in March and they had Model Magic on the supplies list. We got it and my girls were hooked. It provided hours of fun! Why is Model Magic so much more exciting than Play-doh, you might ask? First of all, you can take two colors and massage them together to make a brand new color. My 4 year old focused on this more than making sculptures. She LOVED making different shades and hues. It is easy to mold and work with and is very forgiving. It is also quick-drying clay, so a word of caution- make sure to put it in an airtight container or bag to keep it from drying out!
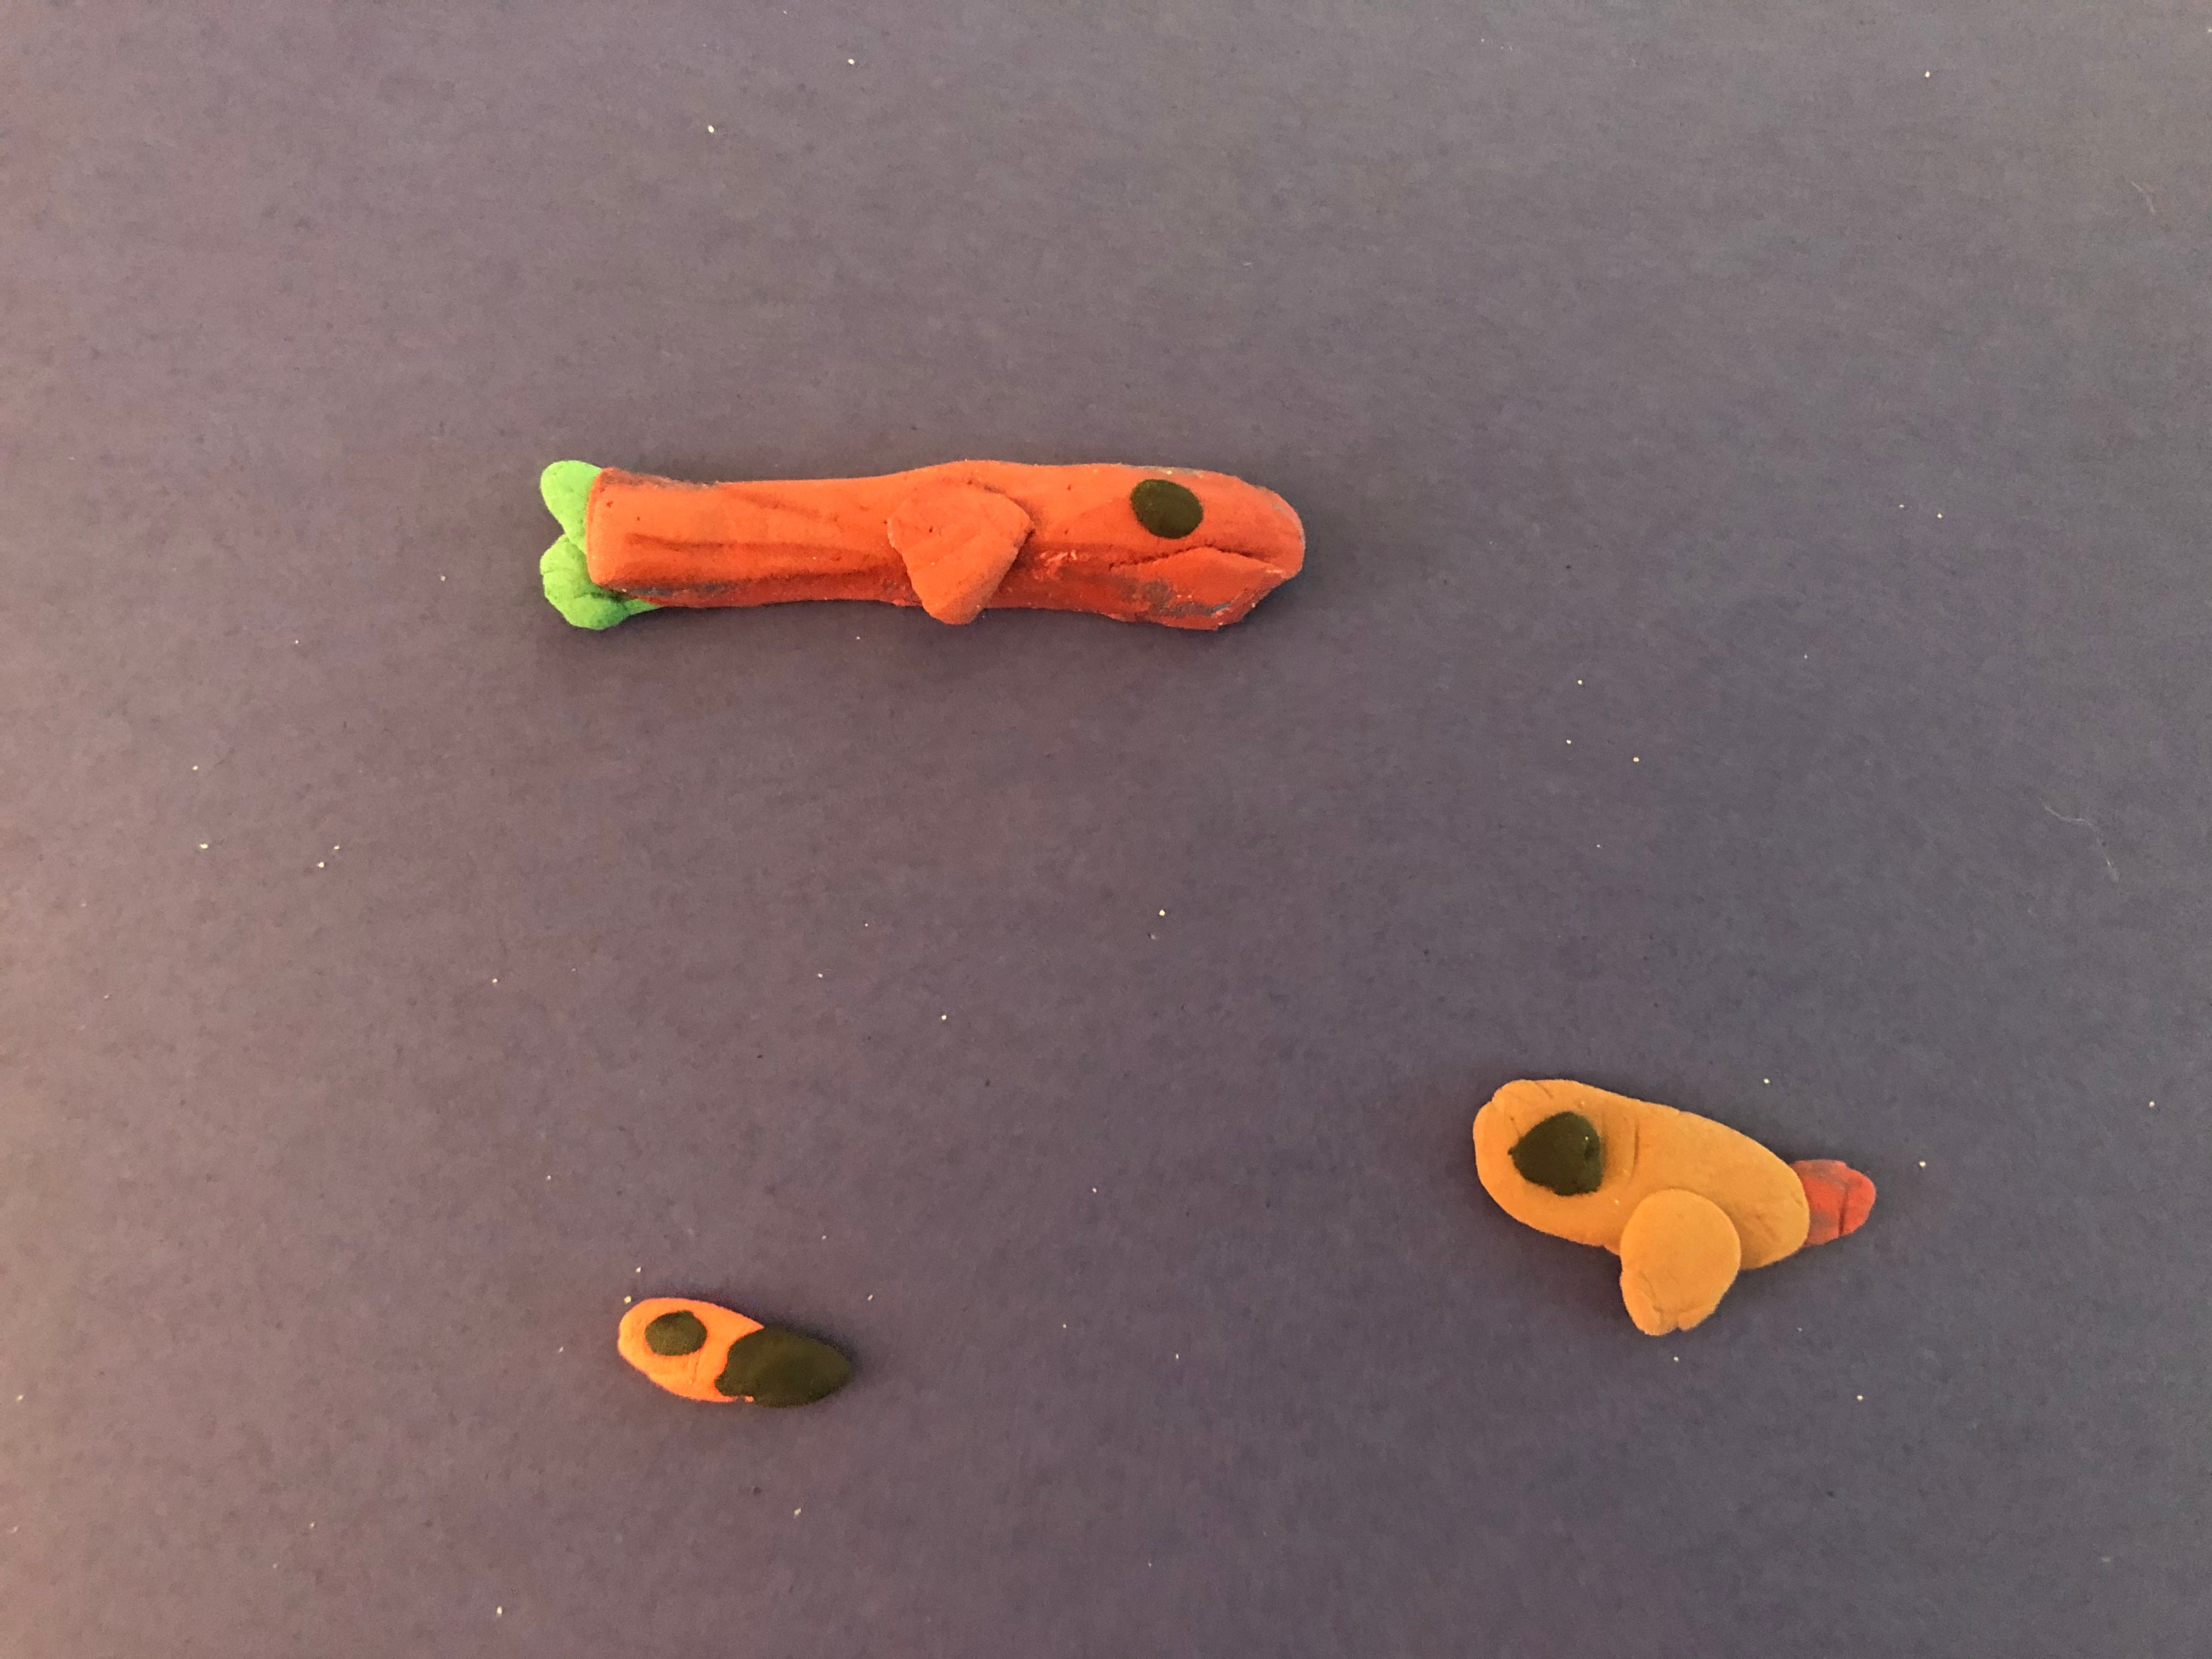
I used the song “The Beautiful Briny Sea” as my inspiration for today’s lesson. I asked the question, “What creatures live in the sea? What do you notice about them?” I found a webcam from the Monterey Bay Aquarium and the girls watched it for a while, noting what they saw. I then gave my girls Model Magic and let them have at it! This was the result:
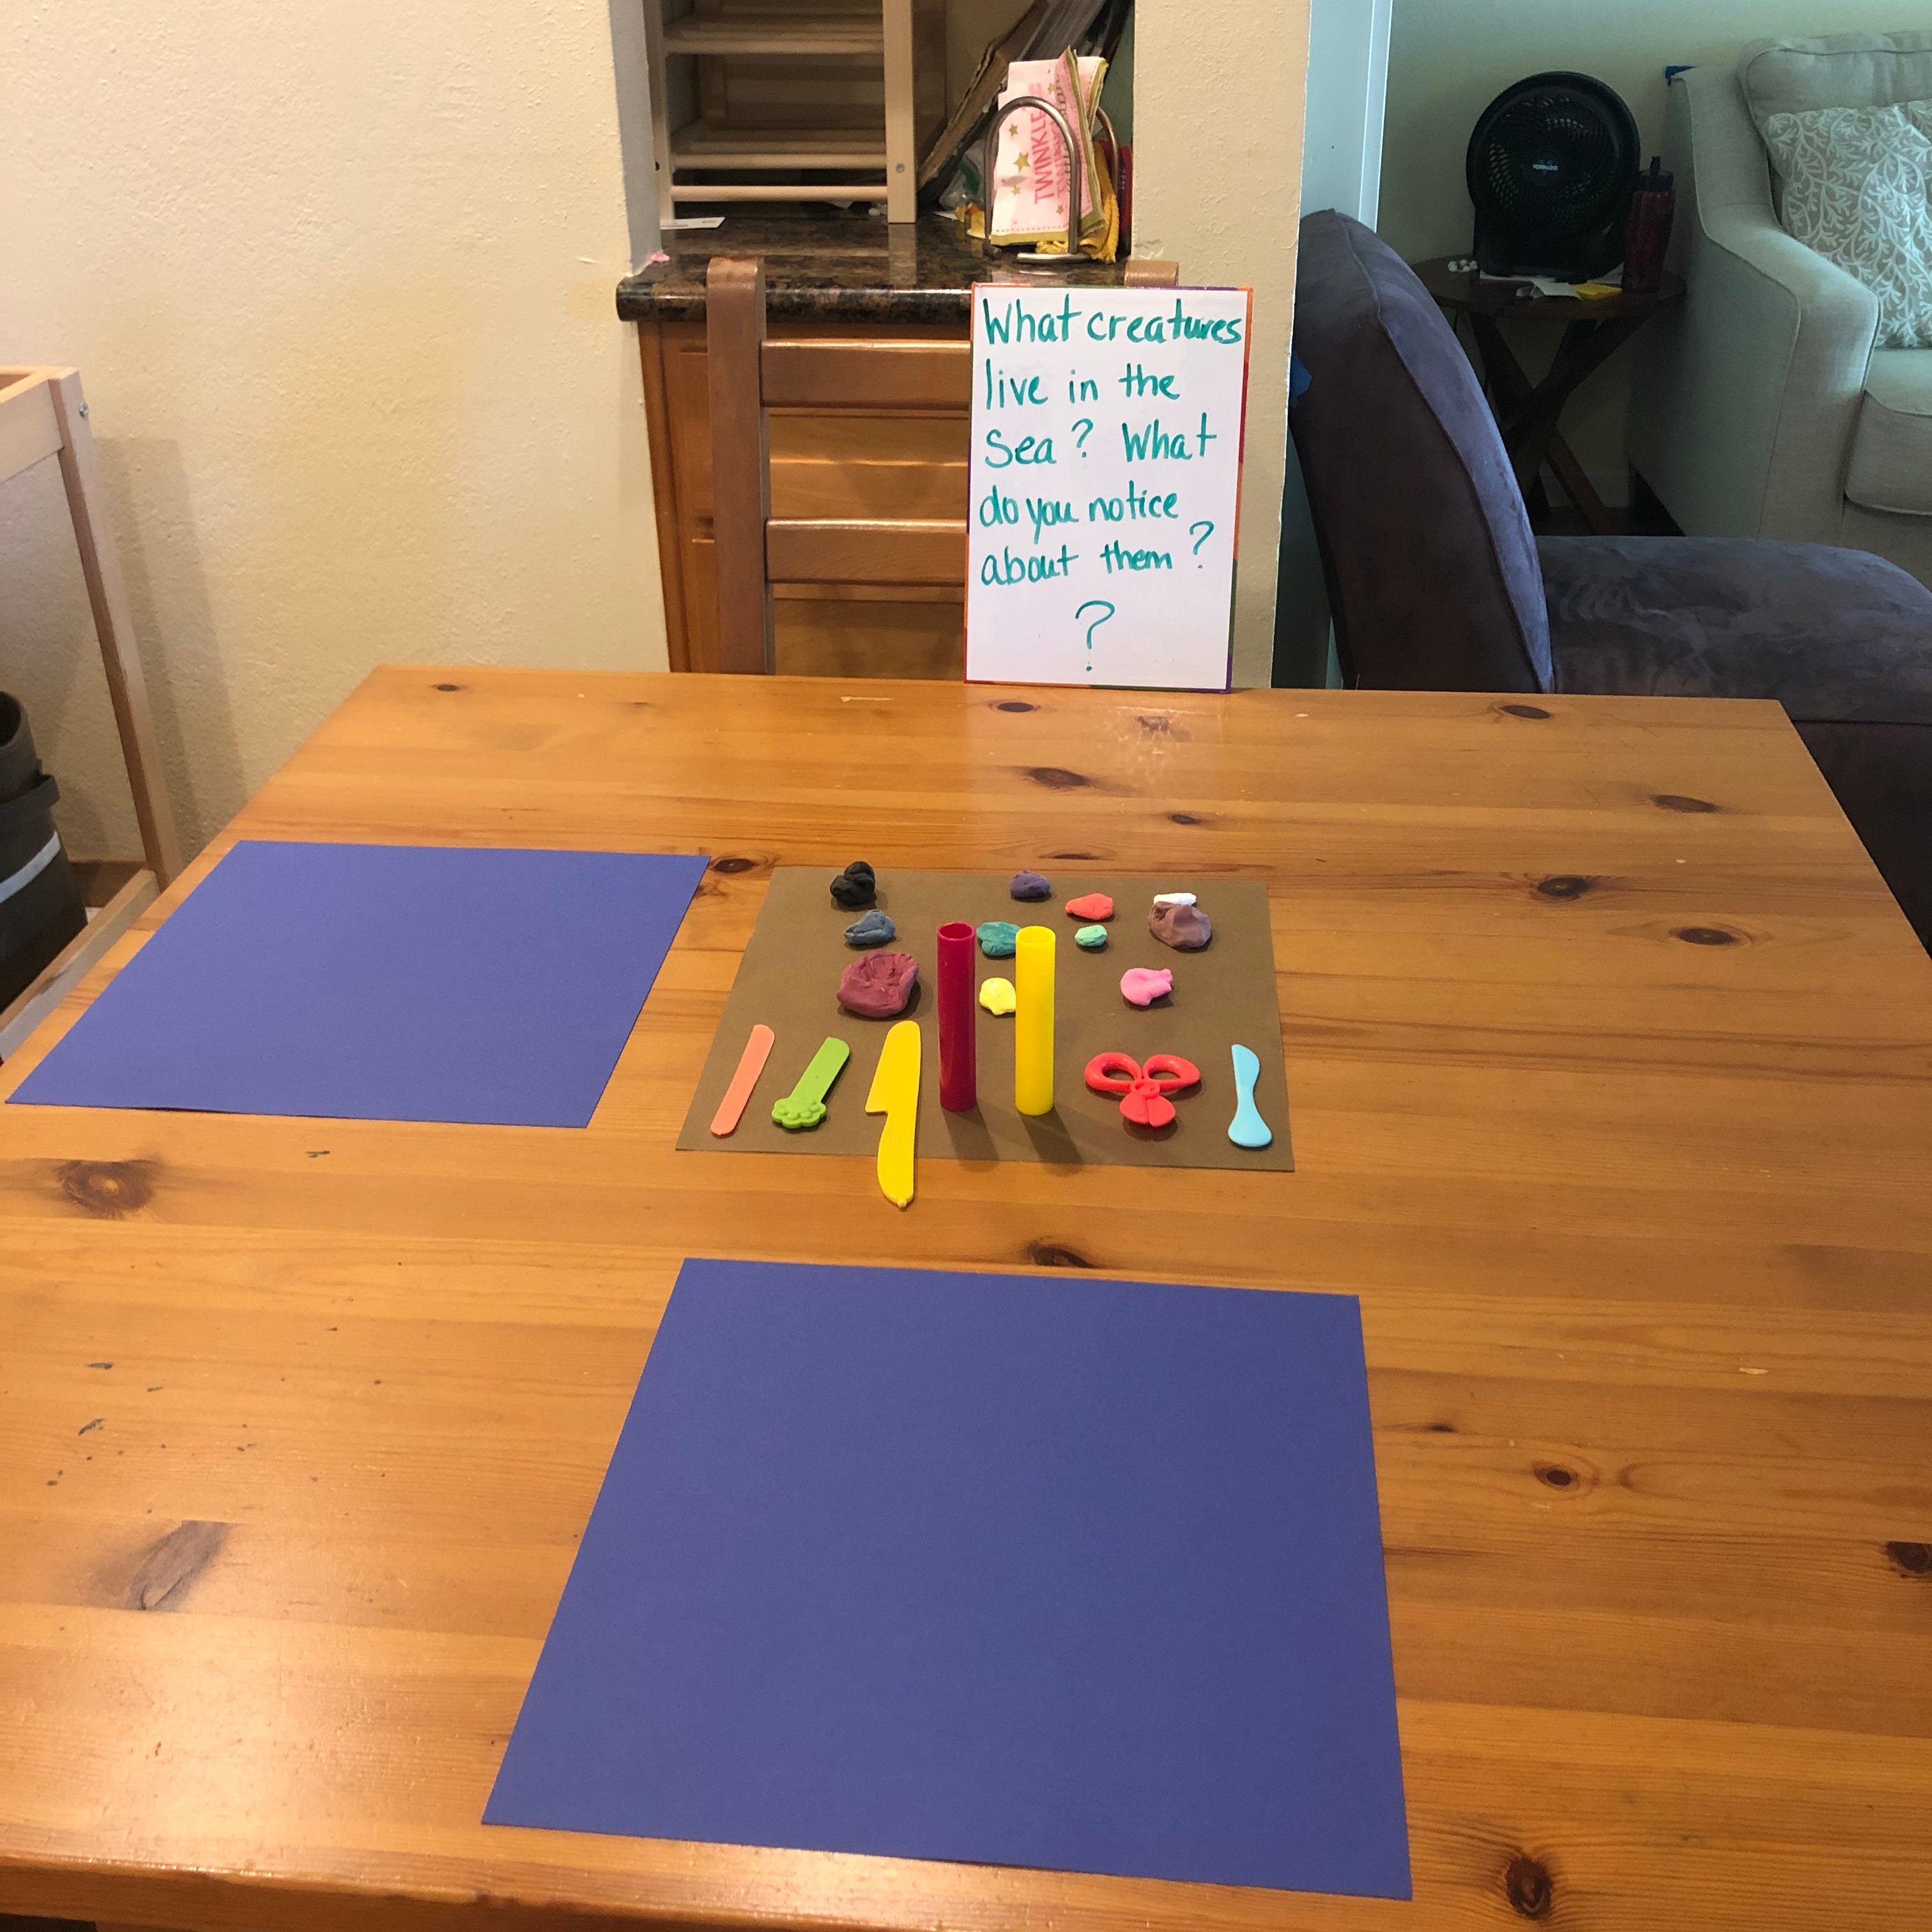
My daughter asked the question, “Do flat fish still have bones since they are so flat?” One of the principles of Reggio Emilia is seeing yourself as a researcher, so I told my daughter that was an excellent question and that we’d explore it together. I tucked it away so that we could research it together later. So, if during these activities your children ask question, jot them down! They can create opportunities for future learning.
Do Flat Fish Have Bones? Extension of Model Magic Question
My daughters and I explored the question that had been posed the day before. We looked up some articles on the computer and found a video on flounders from National Geographic Kids. Yes, they do have bones! And, if you were wondering, flat fish don’t start out flat! First, they are regular fish. Then they go to the bottom of the ocean and start to flatten out. Fun fact: They start out with having an eye on each side of their body and then one migrates to the other side of the body so they are both on one side! So flat fish (flounder, sole, dabs) have a seeing side and a blind side! They camouflage themselves to the bottom of the ocean floor! See? I bet you learned something new today! My daughter found a picture and made her own sketch of the parts of a fish in her science notebook.

Portobello Road: Opening Up Shop: Producers/Consumers, Goods/Services
Today’s activity was a blast! It offered hours of entertainment for my older one. This activity’s materials will differ, depending on what your child decides to do. I reminded my children about the Portobello Road scene from the movie. We talked about the different shops people had. I then asked them what kind of shop they would make if they were on Portobello Road.
One of the most bland, boring topics taught in school, in my opinion, is the goods and services and producers and consumers topic taught in Social Studies. In most situations they are terms you read and a textbook and are supposed to remember. But what if children were encouraged to step into the role of producer and consumer and had to provide a good or a service? Suddenly it’s not such a bland topic anymore. Instead, it’s deeply personal and exciting. The experience is made meaningful.
When you ask the question, “What shop would you like to make if you were on Portobello Road?” I urge you to stay silent and just wait to see what your children say. I have found that, 9 times out of 10, children will come up with more inventive and creative ideas than I ever would. I had some ideas in my mind as to what my kids would pick. I was thinking of grocery store, ice cream stand, bakery. My youngest did come up with a grocery store. She called it “Hold Foods” (Whole Foods). My older daughter surprised me when she came up with hers: a Music Store.
My youngest promptly raided my pantry and created her own little store, complete with sign. She also grabbed bags and made a little check out area. She even made a little credit card (with the help of her sister) so I could shop. At the age of 4, it was more about the play and making up rules that made sense to her. When I tried to buy two of the same thing, she told me “you can only have one of each” and she came up with different dollar amounts for the items I was buying.
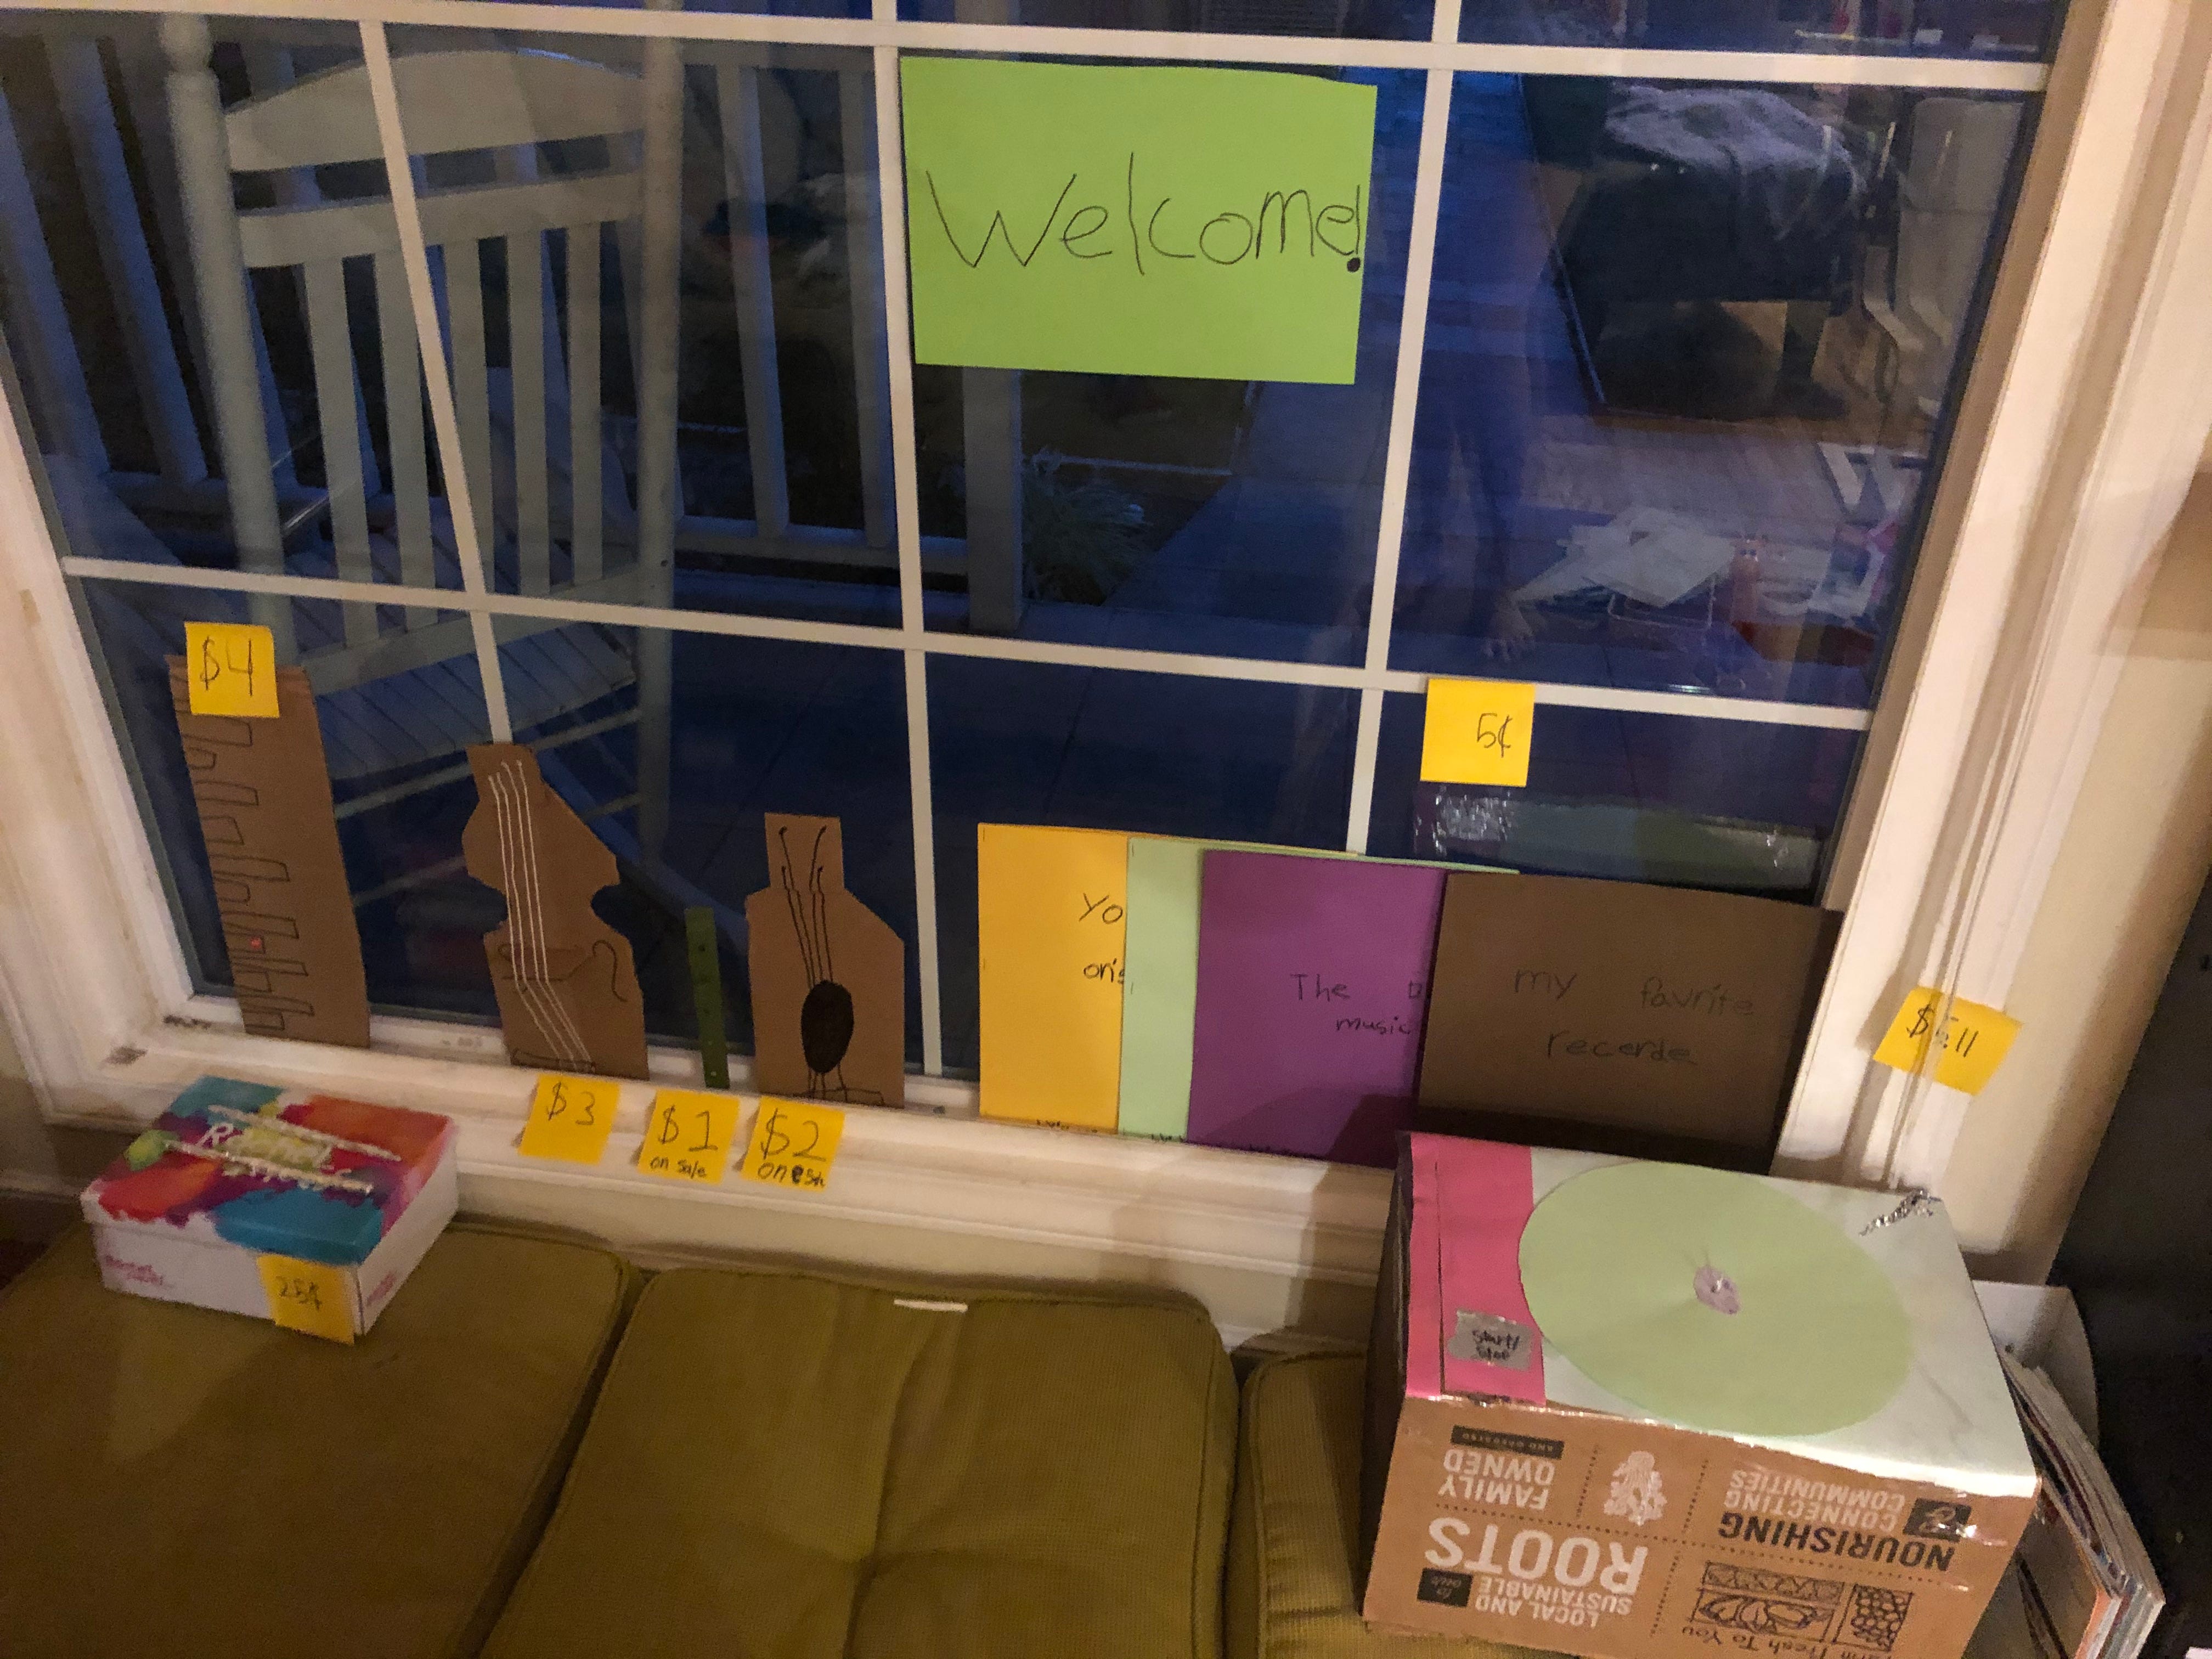
My older one took it to a whole new level. First, I assumed she would want to “sell” her own little musical instruments. We have a little toy xylophone, guitar and flute. Nope- she was adamant that she make her own. That’s when we busted out the cardboard. If you haven’t tried it before, give your children some cardboard boxes and see where imagination takes them! My daughter started out wanting to make records to sell. She cut out round records (by tracing a plate) with holes in the middle (we used math—symmetry to fold the circle in half, then find the middle of the circle and punch half of a hole with the hole punch so that when it was unfolded it made a whole circle) and made slip covers for her records. Next, she set to work on the instruments. She made a flute, keyboard, guitar, and violin. The guitar and violin were complete with strings. She literally planned all of these things herself. I simply provided the jumping off point and the materials. I assisted by providing pictures of the instruments using Google images. She then used critical thinking skills to do the rest. She would try one thing and, if it didn’t work, would try something else. When she would start to get frustrated I would just ask questions that would get her in the right direction of what she should do next. Last, she made a record player for her records, complete with needle. She even manually makes them spin.
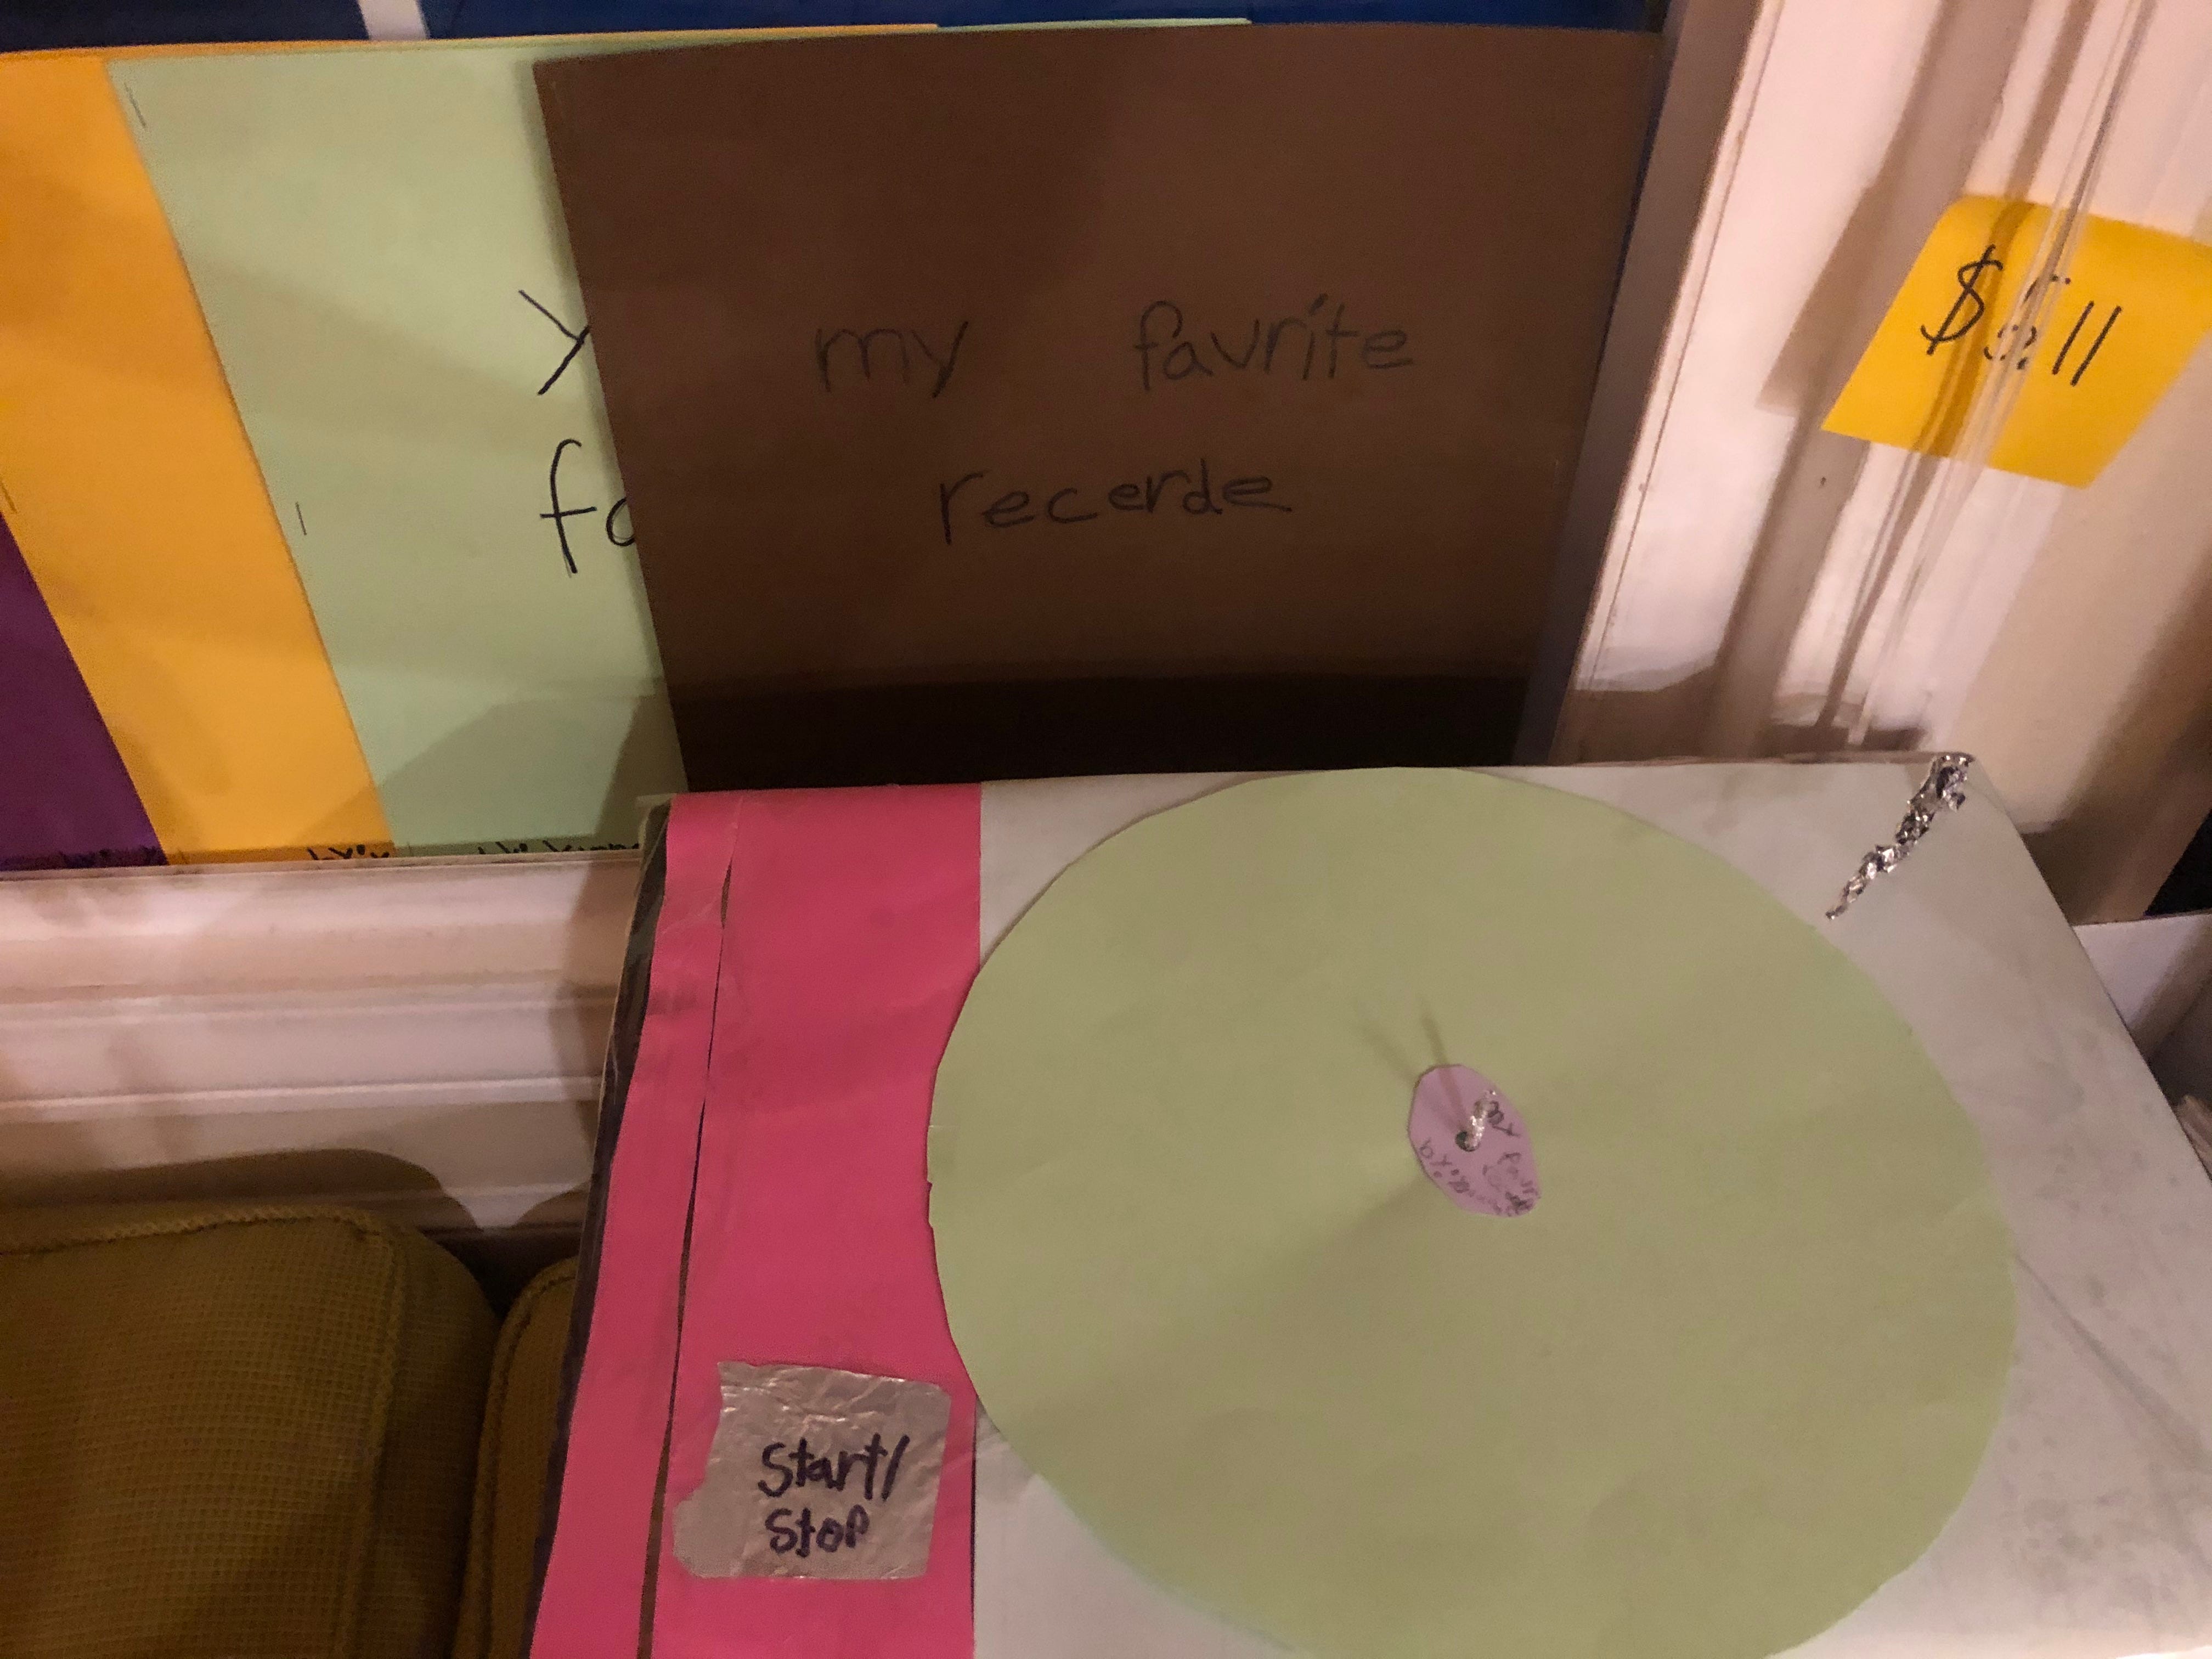
Once the store was ready, she created money. She wanted to make her own dollar bills and cents, but for your children you could easily use play money, money from a game like Monopoly, or even real money to play. This was a great opportunity to practice some math skills. She came up with prices for all of her items and practiced writing dollar and cent amounts, differentiating when to use the dollar sign at the front and the cent sign at the back. She said, “Mama, I want to make this one five dollars, one dime, and one penny.” Together we calculated how much that would end up being. Having just finished first grade, this was a good time to practice her cent amounts (how much each coin was worth) and adding up small amounts to total them when shopping. She was selling her records for a nickel (what a deal!) so we talked about how if a person bought two records, they might give you two nickels, but they also might give you a dime, because 5 + 5= 10. It’s a real-life application of a math concept she’s learned in school. If your child is older, you could add the element of making change.
And, coming full circle, my daughter easily identified her role in the economy. She told me that she was a producer because she made her instruments and records right there in her shop and that she was providing a good to the people who bought them. Take that, bland social studies!
My daughters had a blast doing this activity and it took up the majority of the afternoon. By the evening, my girls were having so much fun with cardboard that they started making a car, complete with trunk and seatbelts, for their dolls. The play then turned into two more days of play, making more instruments for the store including a harp and a xylophone and playing music store. I am telling you—cardboard is the way to go! Hours of fun and a great use for those Amazon boxes, as long as you’re okay with a bit of a mess (and if you’re okay with your kids using scissors!).
If I was in the classroom, I would latch on to this idea that the students are showing interest in music. In the spirit of Reggio, I would turn this interest into a project, weaving in the different standards- reading, writing, math, science into a project. So I intend to do just that! Be on the lookout for a new post about follow up activities for a music project that your little ones will love!
Magic Writing Prompt
In the movie Ms. Price turns people into rabbits. Using that as a jumping off point, I asked the question, “If you had the magic to turn someone into an animal, what animal would it be?” My 4 year old told me her response; that she would turn someone into a lion because she likes lions. Her older sister wrote it down for her. Here is my 6 year old’s response:
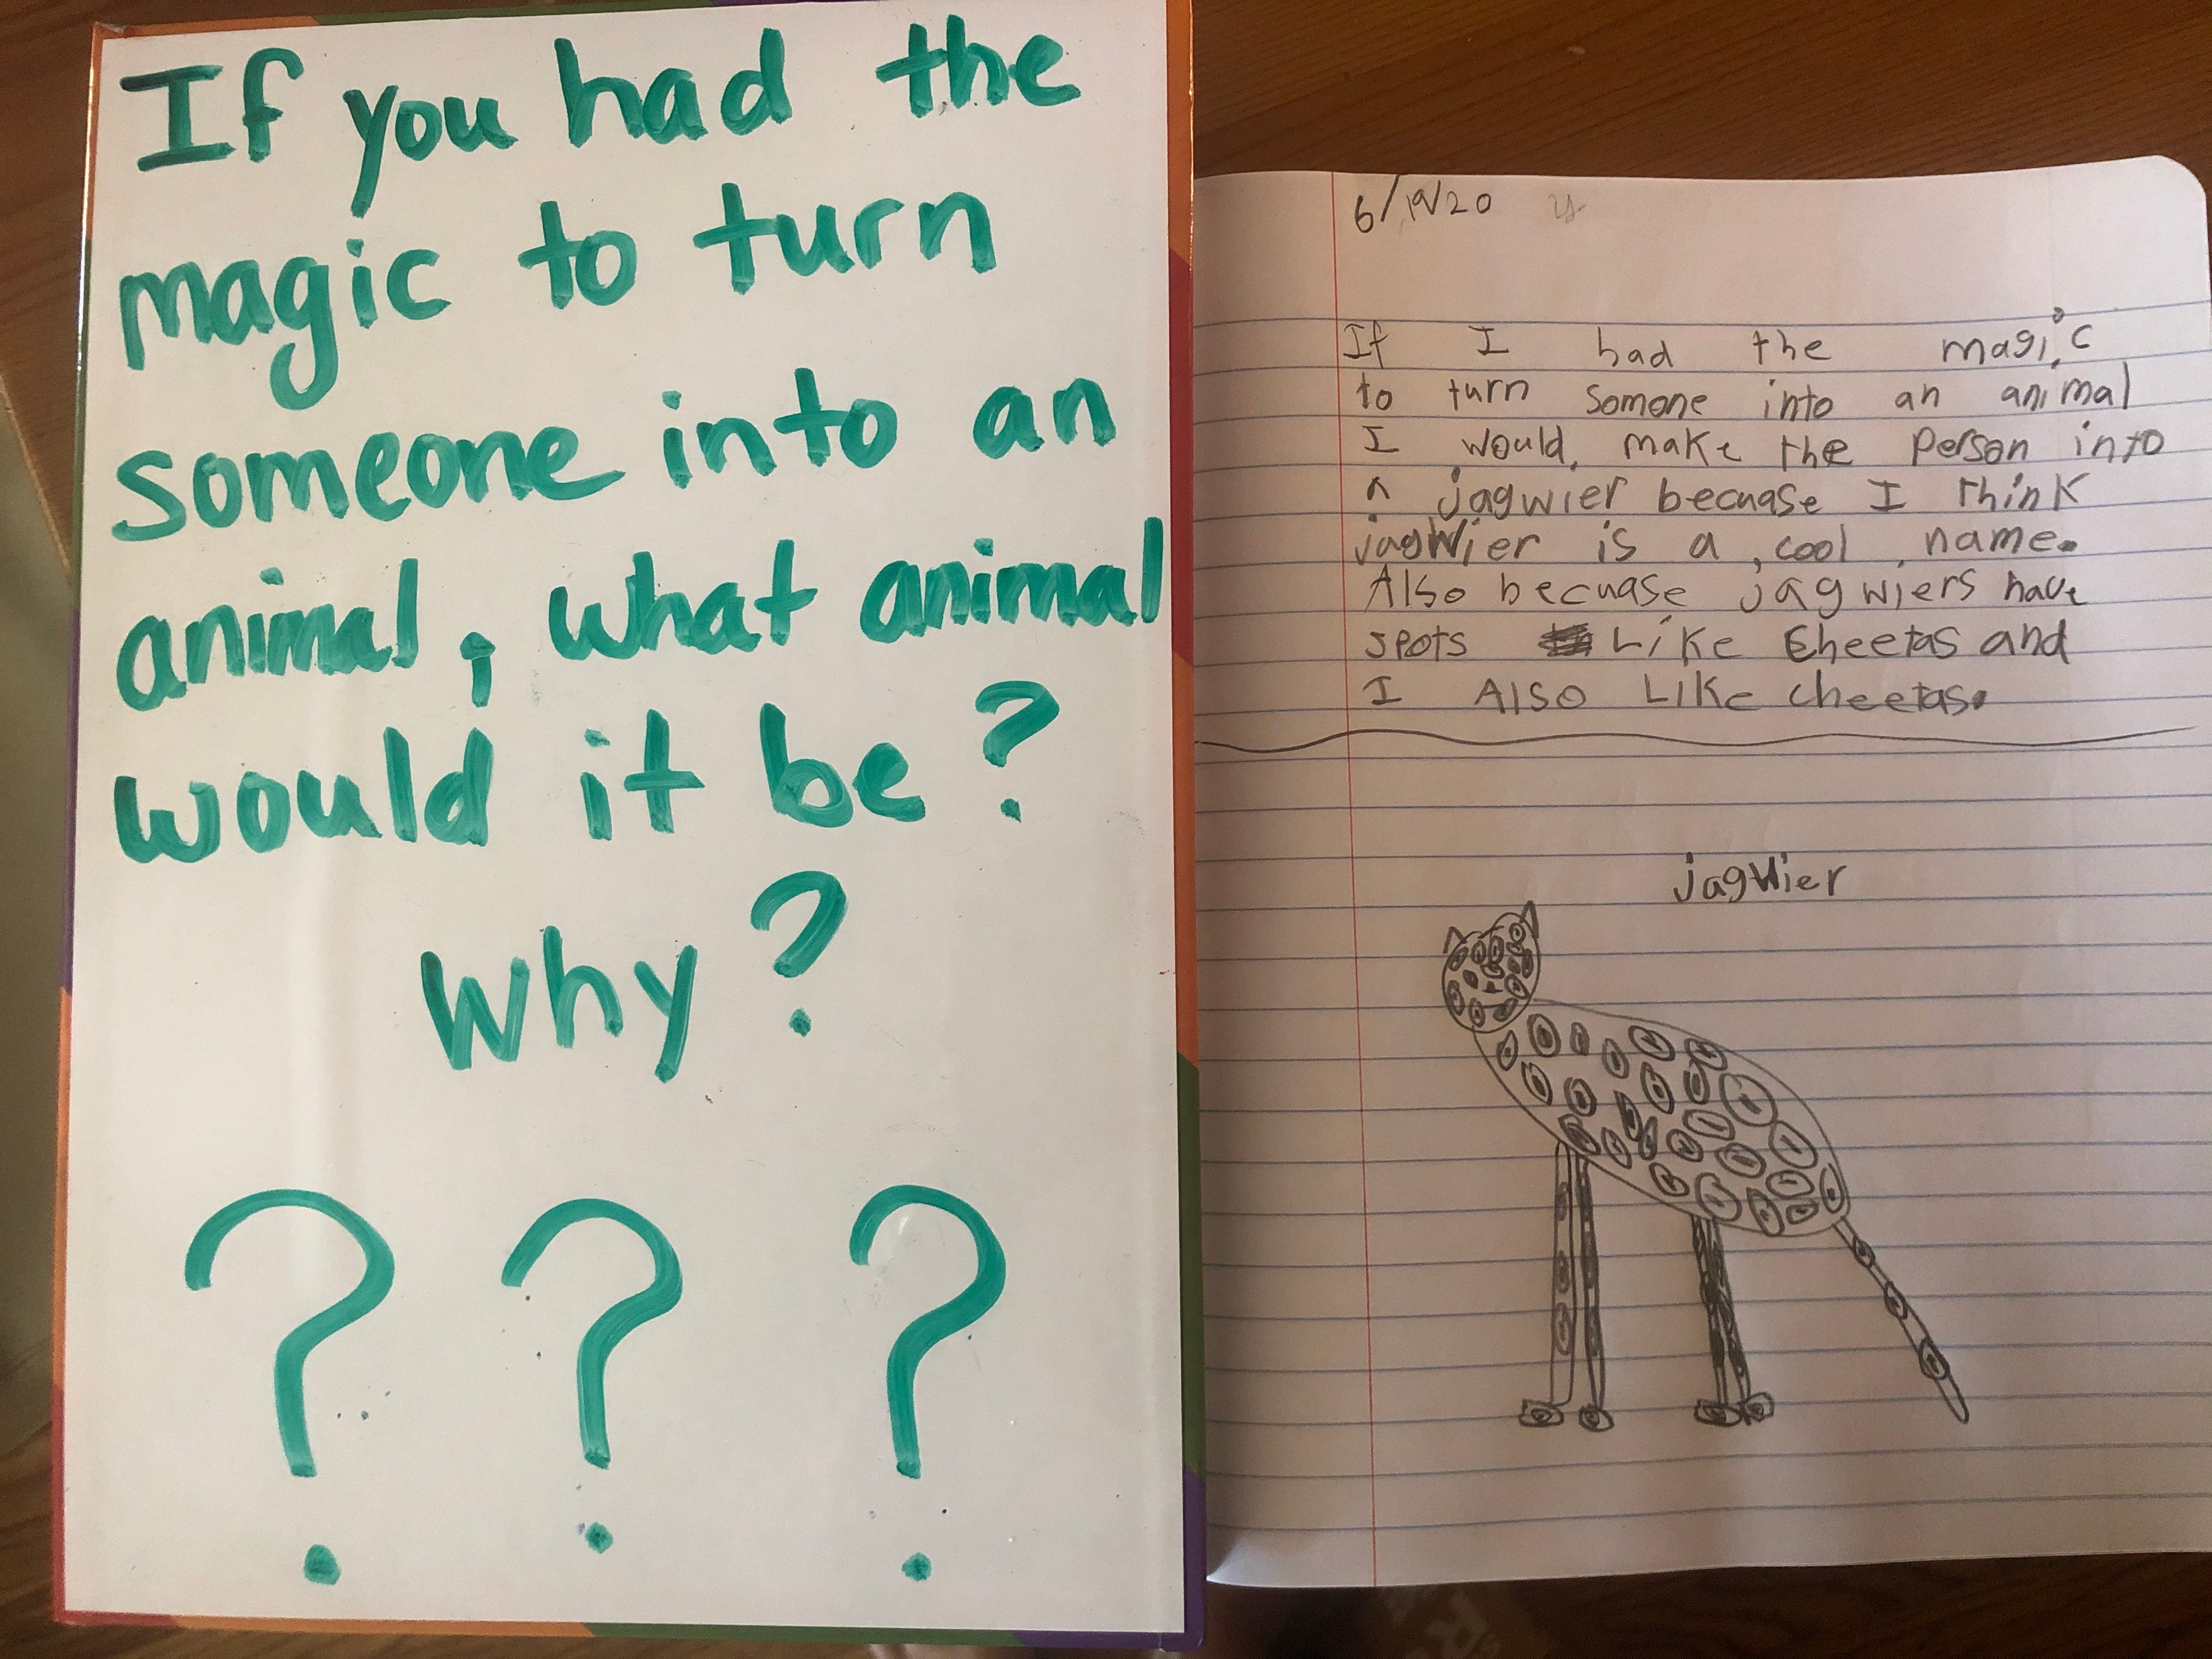
My children obviously did not get the point of Ms. Price changing someone into a non-threatening animal. Another writing prompt idea: “Ms. Price had a cat named Cosmic Creepers. If you had a black cat, what would you name it and why?”
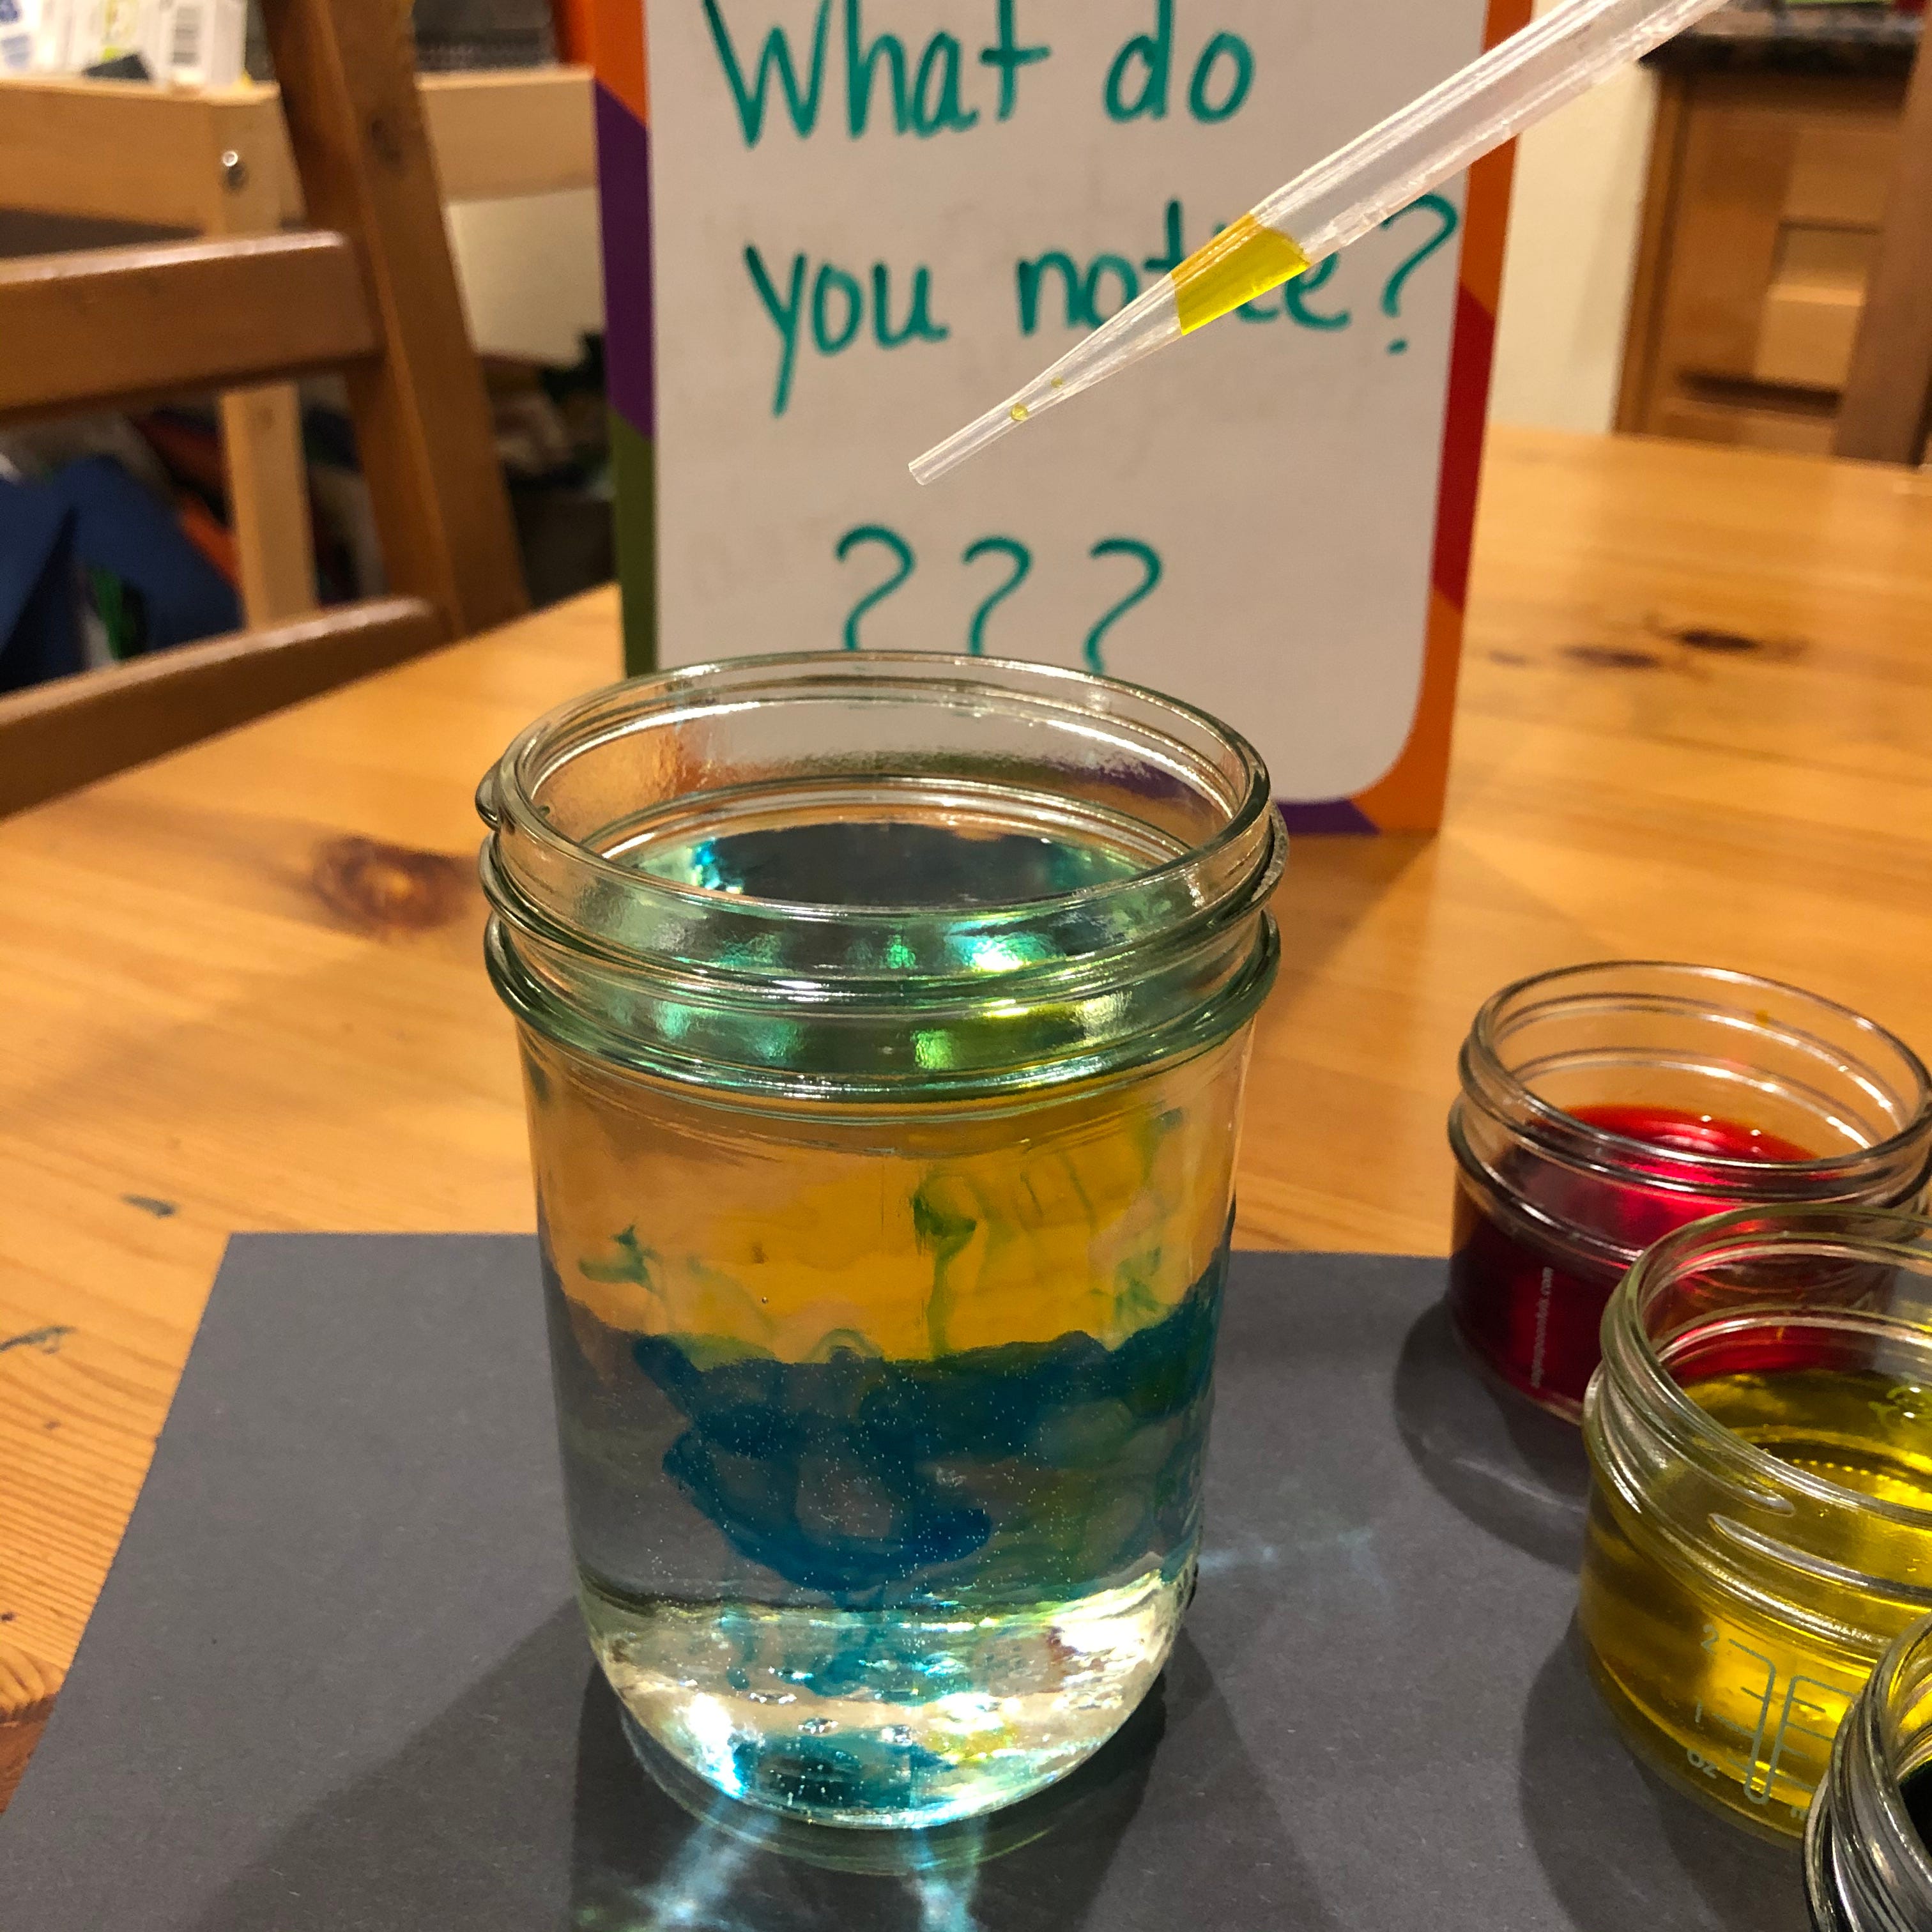
Back To The Beautiful Briny Sea: Color Mixing
Here is a great activity that all kids will love, but will especially amaze younger ones. This activity explores how paint and water mix, as well as how the colors within the water mix. You’ll need a jar of water, water color paints and pipettes. If you don’t have water color paints, you can make your own with water and a few drops of food coloring. Word to the wise- food coloring can stain clothing, so make sure your child wears a paint shirt for this activity, if using food coloring.
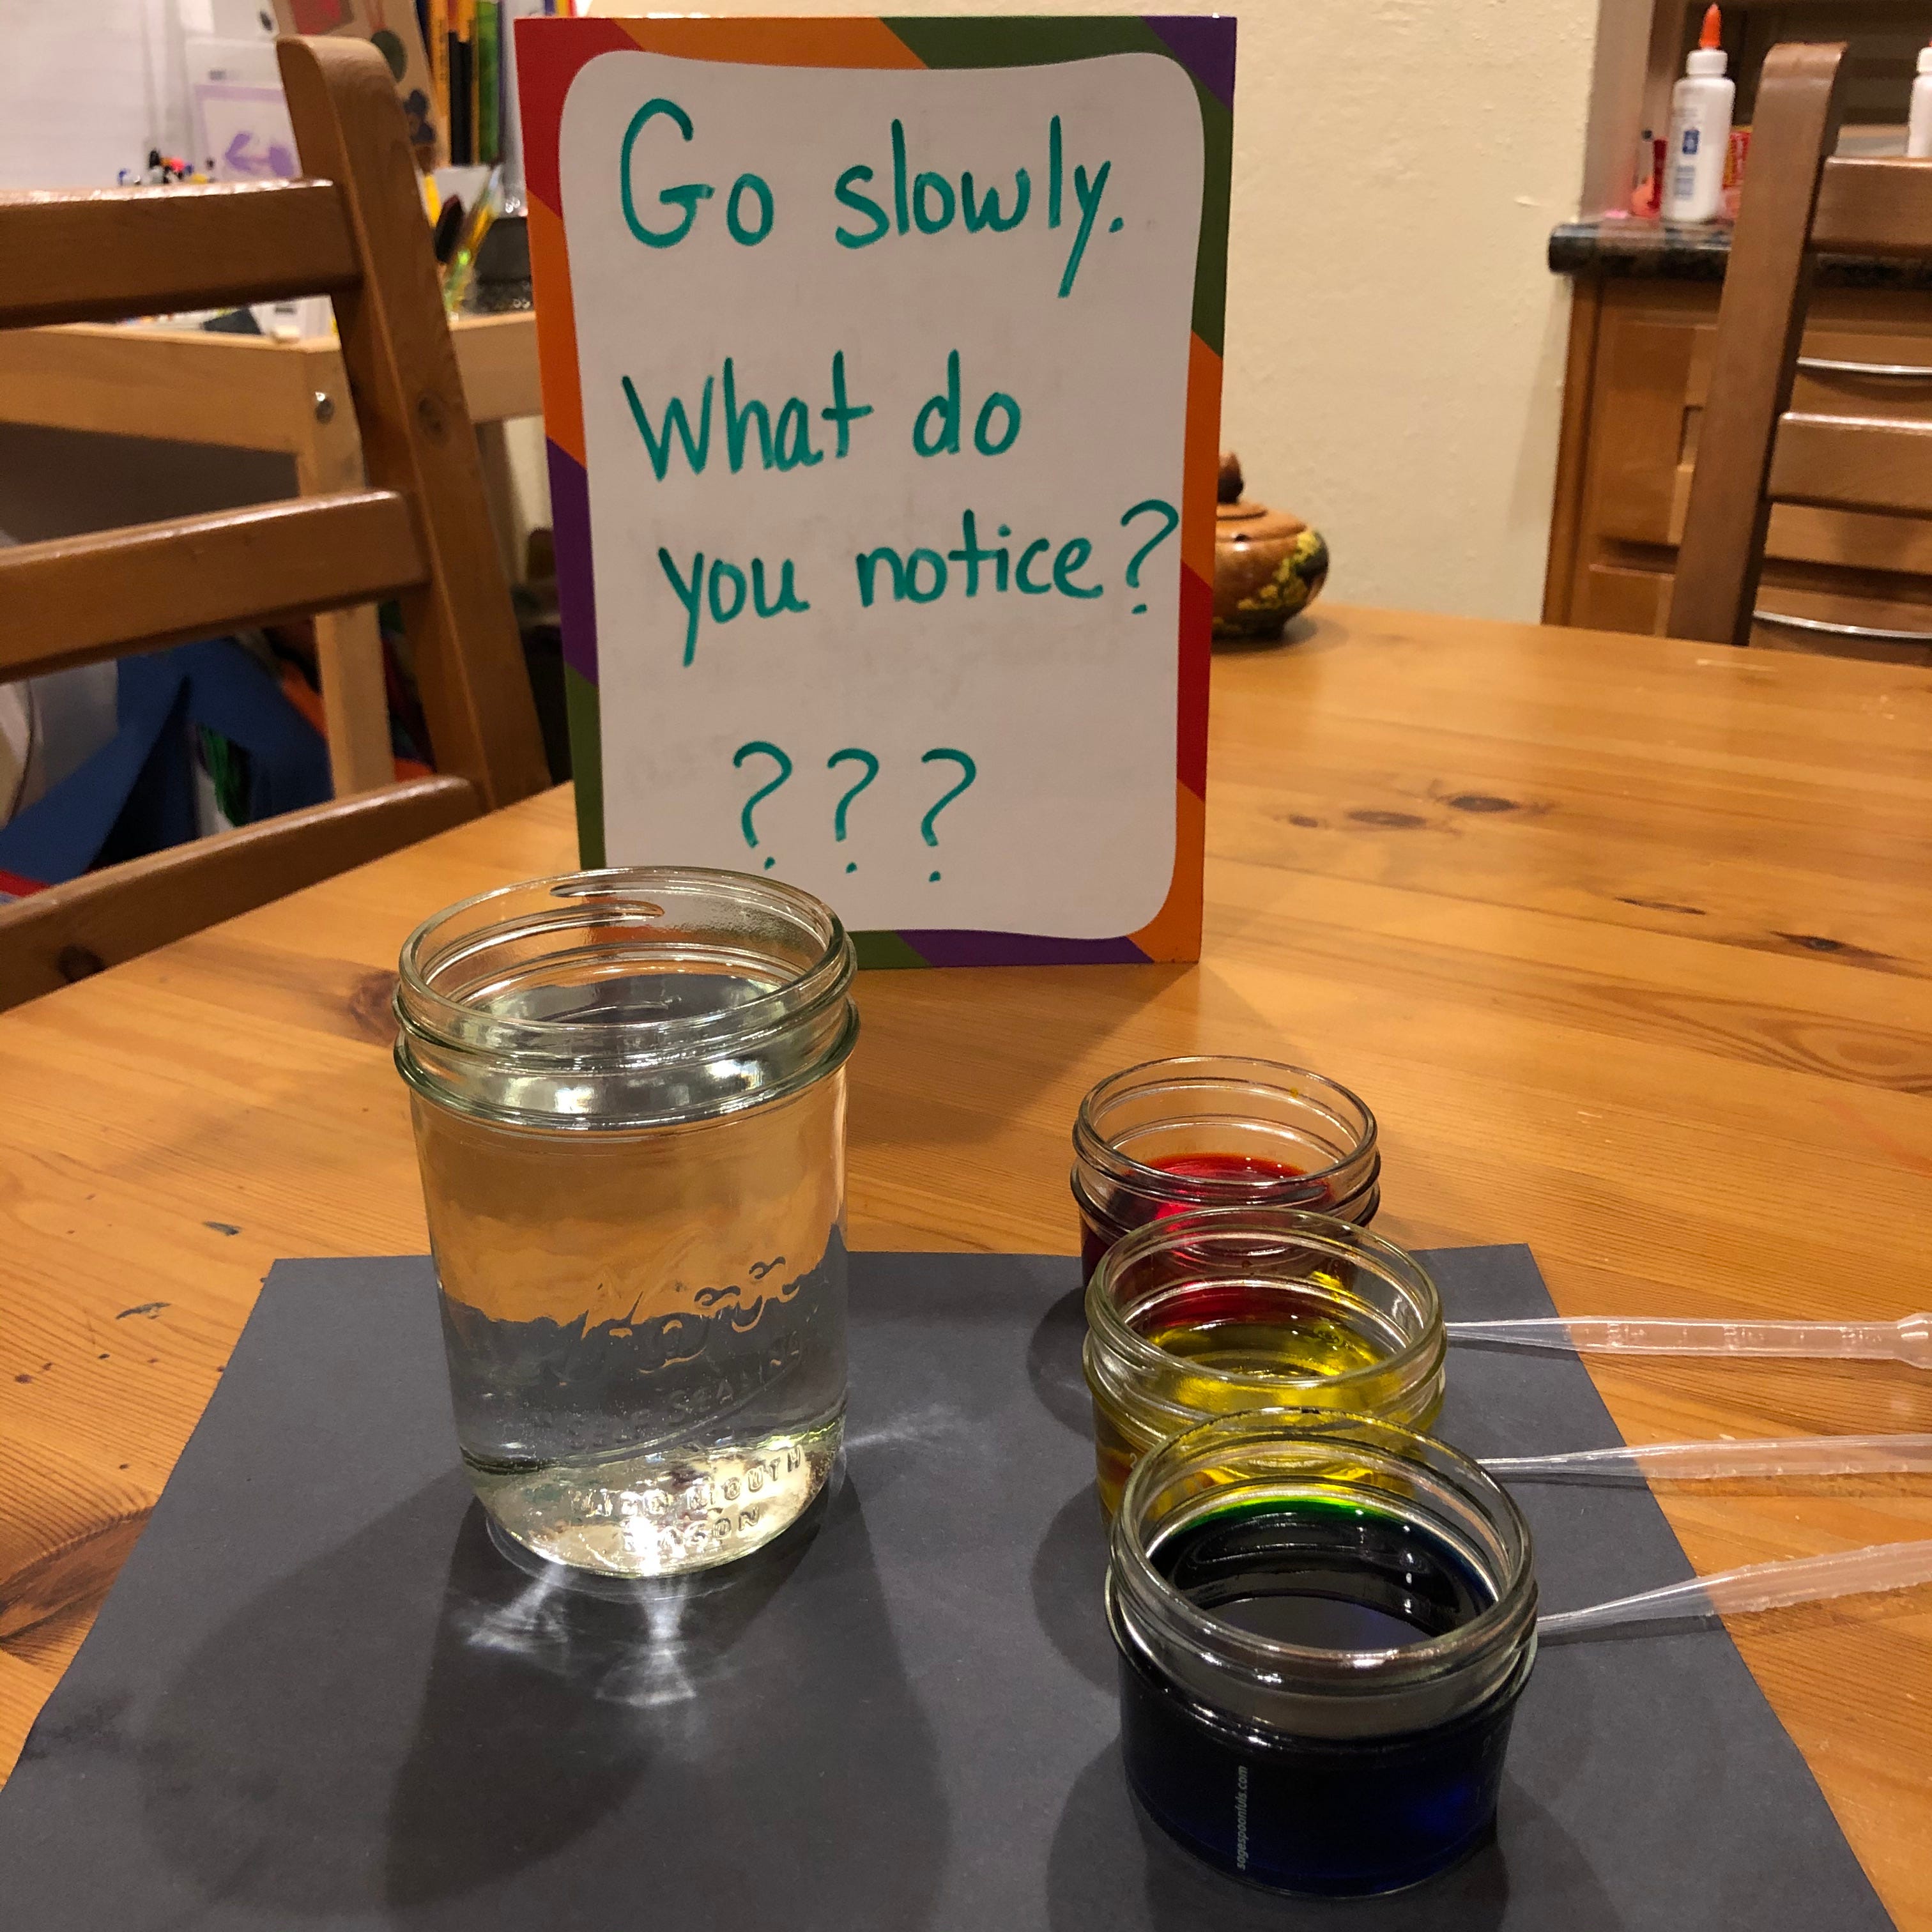
Tell your child to go slowly, noticing each addition of color. Here I have provided the primary colors- red, yellow, and blue. If you wanted to, you could use more of the sea/ocean colors, like different hues of blue, green, and purple. It’s really up to you. Children love dropping the paint into the water and watching it move. After a time, when the water is all filled with color, dump the water out and fill it back up again for more fun! You’ll be amazed how long this activity will keep your children occupied and what they will notice and wonder as the paint mixes with the water.
Magic Tricks
With all the magic of Bedknobs and Broomsticks, I would be remiss if I didn’t use this opportunity to teach my kids some magic tricks. I found a website here that had some great magic tricks for young children.
My kiddos had a blast doing these tricks for each other, practicing their presentation and creating their own magic words. Your child could even write a book of magic tricks, as well. Here is my daughter doing the disappearing toothpick trick. The first two pictures show the trick. The last one shows the reveal of where she had the toothpick taped to her hand.

We also did a coin trick where you take a glass, put a piece of cardboard or a notecard over the glass, and then put a coin on top of the notecard. When you flick the notecard quickly, the card flies off the cup and the coin lands straight in the cup. This is a great opportunity to teach about science and gravity. Due to inertia, the coin remains at rest (stays where it is) when the card is quickly flicked and, due to gravity, the coin falls into the cup. You can also do this with several coins stacked on one another. See how many you can stack! Here is a great video that shows how it’s done!
Movement: Interpretive Dance
There is a part in the Portobello Road sequence where different cultural dances are shown. This is a great opportunity to find a style your child liked and look up some more YouTube videos on dancing from a different culture. Note: make sure to watch YouTube with your kiddos as they often have commercials and you don't know what may be shown, or what may come up in a search. Find a YouTube video on, for example, Scottish Dancing. Observe some of the moves. Then put on some music and let your kids dance and do their own movement to the songs. You may be surprised at how long they will spend dancing, and it’s a great way to exercise!
I hope you’ve enjoyed this learning experience for Disney’s Bedknobs and Broomsticks! Look out for an extension of the music exploration my daughter did based on their music shop coming soon!
~Nicole