

Alice in Wonderland


Happy Spring! Spring break is just around the corner for many schools. If you’re looking for some things to do with your kiddos while they are off for the week, I’m back with more learning experiences based on the original 1951 Disney+ movie Alice in Wonderland!
My daughters had never seen this movie before and with the majority of the movie taking place in nature, I figured this movie was perfect for spring! It also gives some great opportunities to do things outside: garden, play croquet, and look at the moon, as well as plenty of inside options like having a tea party!
The Hook:
Is your child familiar with card games? Show your child a deck of cards. Point out the different suits- the hearts, diamonds, clubs, and spades. Explain that in the movie they are going to watch, there are characters who are like these playing cards. Encourage your children to see if they can spot these characters!
Now you are ready to watch Alice in Wonderland!
Materials:
*Note: this should be about finding what works for you with what you have around the house. If you don’t have these items, you can always adapt the activity to work for you. No paints? No problem! Use crayons or clay! No index cards? Cut paper down to index card size.
-construction paper or cardstock
-coloring supplies: pencils, colored pencils, markers, crayons
-paints: red, purple, and white
-paintbrushes
-playing cards
-index cards (or paper cut to index card size)
-paper plate
-cups
-dirt or soil
-seeds (these can be seeds you find around the house after you eat a snack: apple seeds, cucumber seeds, raw sunflower seeds, uncooked beans, etc.)
-ziplock bag
-paper towel
-Oreo cookies
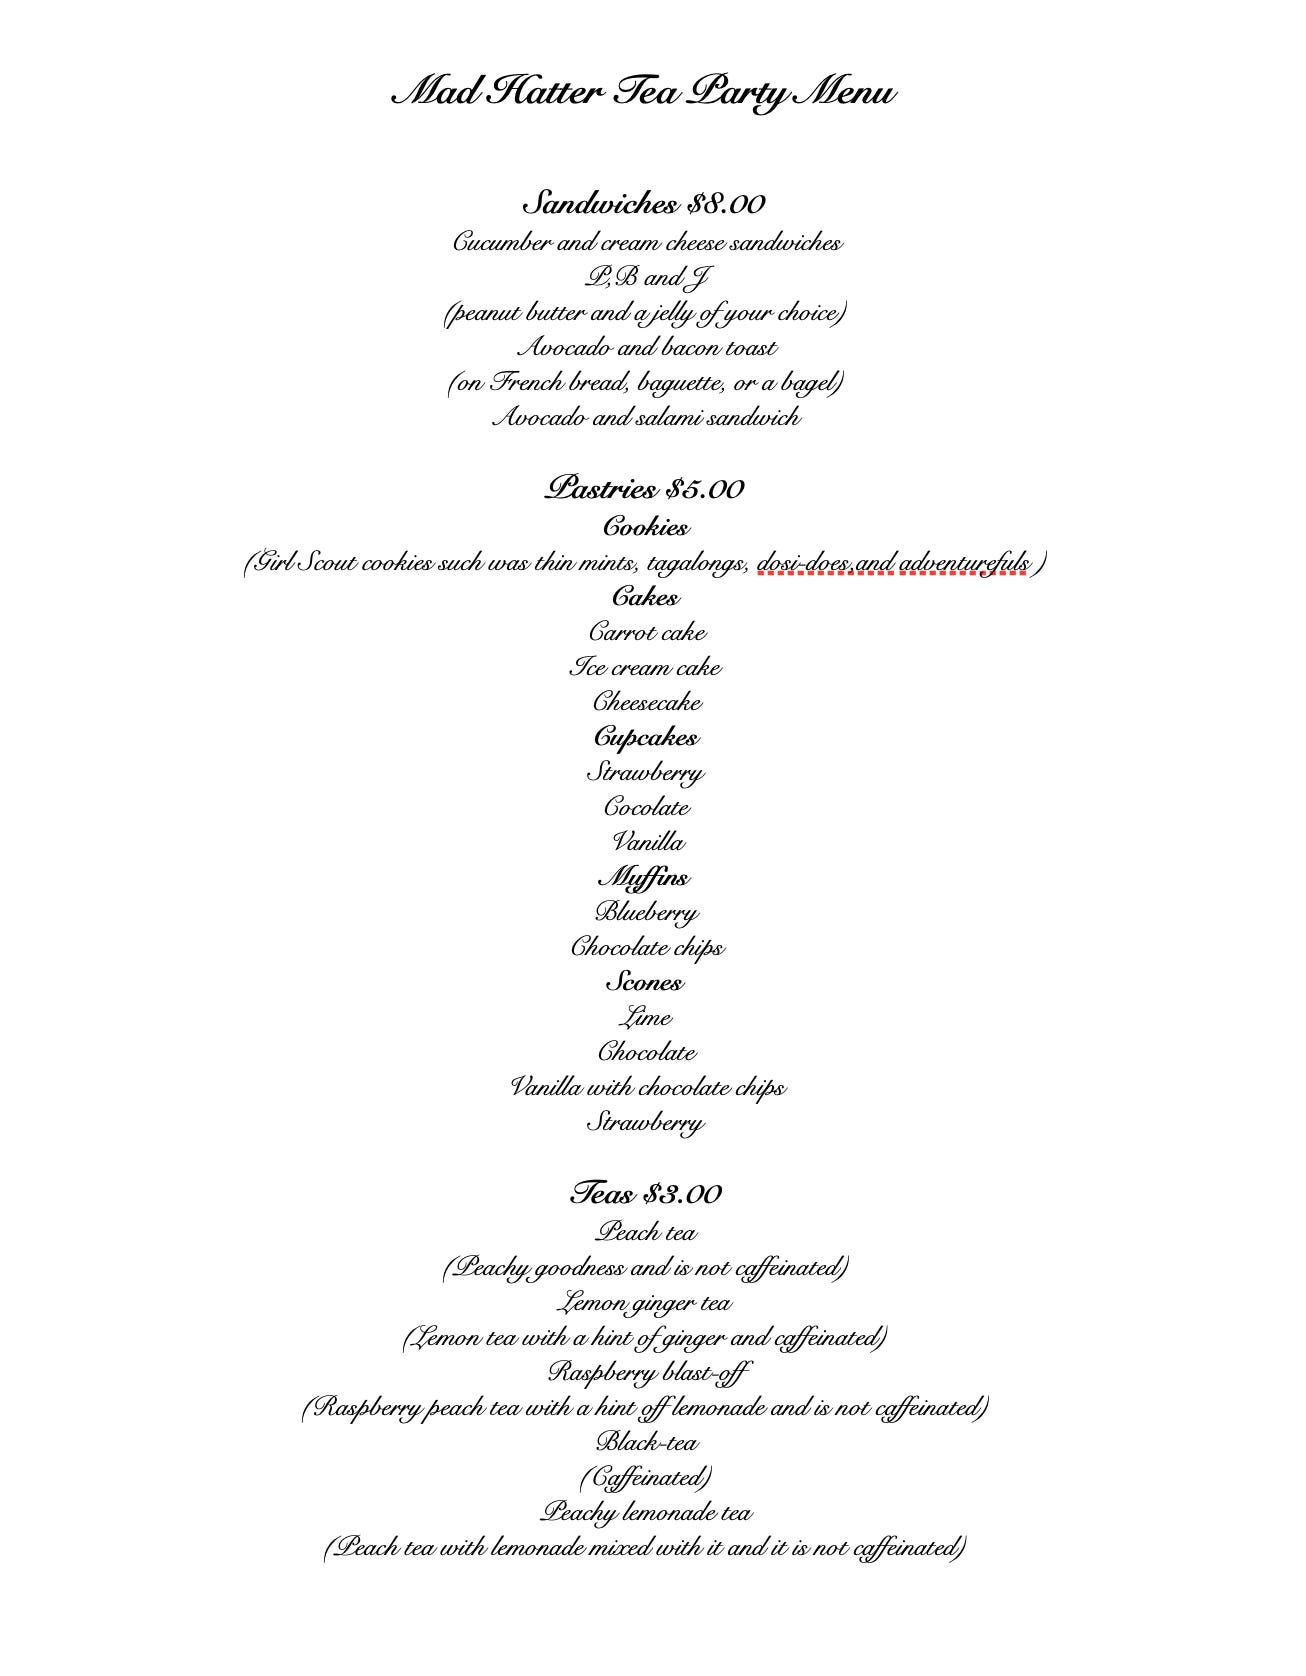
Tea Party Menu
Who doesn’t love a tea party? This movie is a great excuse to have a tea party! Have your children make a tea party menu. My daughter wanted to type hers up so that it would look like a “real” menu. Typing on the computer is a great tool for encouraging hesitant writers! They can play around with size and font to get just the right look!
Eat Me! Make Your Own Dessert
In the movie Alice discovers various different cakes that say “Eat Me” that cause her to grow to different sizes. My daughters love to come up with their own desserts. This one, pictured in the first picture at the top in our tea party, was created by my nine year old. It’s quickly become a family favorite!

Drink Me! Make Your Own Drink
My seven year old decided to create her own mint tea. Then she wrote a recipe. It’s called “Long Tea”.

You could also do some taste-testing! Have your child get together several different drinks. Another family member wears a blindfold, tastes the drinks, and writes down which drink they think it could be!
Baking With Fractions
My daughter suggested that if we have a tea party, we make scones! Try making scones at home. Here is an easy recipe to follow. Encourage your children to play with the fractions. If the recipe calls for 2 cups of flour, how many half cups is that? How many quarter cups?
Twinkle Twinkle Little Bat
My daughters LOVED the part at the Mad Hatter’s tea party when the Doormouse makes his own “Twinkle Twinkle” rhyme. They would quote him for days. So I had them make their own “Twinkle Twinkle” rhymes. Here is one of them:

Create a New Card Suit
In the movie the guards are a deck of cards. Encourage your children to create their own card suit. My daughter wanted to create cards with different suits. She got SO into this activity that she spent 3 days taking her cards with her wherever she went and adding to them. You never know which activities will really speak to your child. Just see what they enjoy and let them take off with their creativity!

Create a New Card Game
Have your children create their very own card game! They can use a regular deck of cards or their own, if they made their own. My daughter was so excited about this! Encourage them write down the rules. This really gets them to think about their reader and audience. My daughter kept rereading her work and asking, “If I write this, will the reader know how to play?” It’s a great practice for anticipating what your reader might wonder and then answering that question. If you have a child who isn’t writing yet, or writing is frustrating, have them tell you the steps! Oral language practice is important, too! They have to organize it to tell it in a way that makes sense and will practice using words like “first”, “next”, “then”, and “last”.

As you can see, my seven year old’s spelling is a bit atrocious. That’s okay! Don’t focus on the spelling; focus on the content. She's writing and she’s loving it! That’s what is important!
The Cheshire Cat: Phases of the Moon
When I was little, my family and I would always refer to the moon as a Cheshire Cat smile because that’s exactly what it looked like to us! There is in fact a scientific term for a Cheshire Cat-looking moon. It’s called a Wet Moon and you can read more about it in the Farmers’ Almanac here! Of course when my family was seeing the Cheshire Cat smile, we were talking about the Waning Crescent and Waxing Crescent phases of the moon.
This is a great opportunity for your children to learn about the Phases of the Moon!
Here is a National Geographic Kids website on Phases of the Moon.
Homeschool Pop has a 13 minute phases of the moon video.
If you are looking for something shorter, Sci Show Kids has a less than 4 minute video.
Note: As always, please make sure to watch Youtube with your kiddos. You never know what ads may show before, after, and often even in the middle of videos.
Moon Cookies

For more fun with phases of the moon, your children can create different moon phases using Oreo cookies. It’s fun and delicious!
Take a paper plate and 8 Oreo cookies. Divide the Oreo cookies in half. You need to keep the sides that have the white cream on the chocolate cookie. The other sides that are just chocolate cookies can be enjoyed with some milk! Or save the for your Mad Hatter tea party!
Your child will make the phases of the moon by scraping some of the Oreo cream off of the cookie. You can use a plastic knife or just have them use their teeth!
In the center of your plate (or even just on a round piece of paper) create your Earth. This can be done by coloring blue and brown splotches so that it looks like the land and water of Earth.
For the first phase, take your new moon and put it on the top of your plate. Your child will need to scrape off all of the cream from this cookie. Make sure to label it “New Moon”. Next you’ll have your Waxing Crescent. Your child will want to scrape off all of the cream except for the small Cheshire Cat smile. Third, you’ll have your First Quarter, which will scrape half of the cream off of your cookie. Fourth comes the Waxing Gibbous where your child will scrape about a quarter of the cookie cream off. That brings us to number 5: The Full Moon! Your child doesn’t have to do anything to this cookie! Now for the last 3, we just do the reverse. For the Waning Gibbous your child will again scrape off about a quarter of the cream. Then it will be the Third Quarter where they scrape off half. Then last we come to the Waning Crescent (that Cheshire Cat smile) that will have them scrape off all but a quarter of that cream, leaving another smile. Then, voila! You have a delicious demonstration of the Phases of the Moon! After admiring for a while, eat!
Painting the Roses Red

In the movie, the Queen of Hearts wants EVERYTHING red. Her guards accidentally planted white roses instead, so they are painting the roses red. Paint a picture using various hues of red. Give your child some red, white, and purple paint. I used acrylic paint, but you could try watercolor paint or finger paint. If you don’t have paint, try it with Play-Doh or clay! Let them mix to create different shades. Start with red. Then, to make a lighter shade of red, add some white. The more white they add, the more towards pink it will go. If they add purple to the red, it will turn a darker red. Your kiddos could paint flowers, patterns, or a series of hombre lines, going from light to dark.
In the Garden- Will It Grow?
In the movie Alice runs into a bunch of flowers who sing to her and then accuse her of being a weed. Spring is a great time for planting! Your kids can do a science experiment to see whether or not something will grow!
Create a hypothesis with your kids. Some ideas include “Will a seed sprout in the dark?”, “Will a seed sprout without water?" “Will a seed sprout without soil?”Grab a few cups and label them with what you want to find out. Add a seed of some sort. This could be a bean (uncooked of course), a raw, unshelled sunflower seed, or seeds from an apple.
Choose one of these questions and set up a control seed and an experimental seed. For the control, you will do everything you normally would do to get a seed to grow— give it soil, water, and sunlight. For the experimental you make only one change. For example, you might give it soil and water, but no sunlight.

Set up your experiment and then observe. Each day, have your child draw what they observe. If it’s still cold where you live, make sure to put your control seed near a sunny windowsill or window.
Spoiler alert: You’ll be surprised to see what happens between a plant with no light and a plant with sunlight. You’ll be surprised to learn that it does indeed sprout! But its look will surprise you. Try it!
Plastic Bag Gardens

Here’s another variation of the experiment. Ask your children if they think seeds will sprout and grow without soil. Take a plastic sandwich bag. Take a paper towel and get it damp. Staple the paper towel inside the sandwich bag. The reason we staple it is to give the beans or seeds a shelf to sit on. Label the seeds you choose to grow if you are using different ones so you can tell which is which. Tape the plastic bag up in the window and see what happens!
Playing Croquet
Send your children outside to play a game of croquet! Have them get creative with their props. Alice used hedgehogs for balls, flamingos for mallets, and cards for wickets. What can your children use for wickets, balls, and mallets?
Telling Time
The White Rabbit is late for a very important date! He looks at his pocket watch and shouts “I’m late!” throughout the movie. Have your children make their own clocks at home using a round piece of card stock. Make the hands out of card stock and attach using brads so the hands can move around. You can get a free template for making a clock here.
A.M. vs. P.M.
Have your child illustrate pictures of what they do during the day or night. Then have them label the pictures A.M. or P.M. A.M. (latin for ante-meridien) is the time between midnight and noon. P.M. (latin for post-meridian) is the time between noon and midnight. For example, children can draw a picture of them eating breakfast and label it “8:00 a.m.” or draw a picture of walking their dog and label it “4:30 p.m.”

Measurement Scavenger Hunt
Alice meets a caterpillar who is offended by Alice’s comment that 6 inches is a dreadful size to be (he is, in fact, 6 inches tall). Give your child a ruler or measuring tape, or measure a piece of string 6 inches long and give it to your child. Have them go through the house and yard on a scavenger hunt for everything they can find that is 6 inches long or 6 inches high. Have your children draw and label all of the objects they find!
I hope you enjoy these Alice in Wonderland Learning Experiences! Let me know what you think! Enjoy your spring break!
~Nicole